
Resource Hub
Step-by-step guides for our Dung Master grow bag, Inject & Forget BRF grow bag and Core Monotub kit, plus information on legality, returns and storage.

Grow guides
All-in-One Dung Master Grow Bag Guide
Inject, grow and harvest with the dung-enriched all-in-one grow bag
Read the guideInject & Forget BRF Grow Bag Guide
Inject, keep it sealed, then harvest: the Inject & Forget BRF bag
Read the guideCore Monotub Cultivation Kit Instructions
Inject the grain bag, mix it into the tub, then grow and harvest
Read the guide
Help and policies

Grow Bag Instructions
Comprehensive Instructions for Grow Bags
Click Here
Psilocybin Legality
Understanding the Legality of Psilocybin
Understanding psilocybin legalityReturns & Replacements
Clear Return and Replacement Policy
Our Replacement PolicyStorage & Shelf Life
Proper Storage and Shelf Life Tips
How to store spore syringes



All-in-One Dung Master Grow Bag Guide
Follow this complete step-by-step guide to using your All-in-One Dung Master Grow Bag from Tripping Store.
Thank you for choosing the Dung Master All-in-One Grow Bag! This bag is designed for high-performance results using a dung-enriched substrate (the growing material inside the bag).
Please read this guide fully before getting started.
Inject the bag
- 24 hours before you inject, take your spore syringe (the tube of liquid you'll inject) out of the fridge so it reaches room temperature.
- Wash your hands or put on gloves.
- Take the bag out of its packaging. Don't use scissors!
- Give the syringe a good shake.
- Attach the needle.
- Do not heat the needle. It's pre-sterile (already germ-free).
- Clean the rubber injection port (the spot where the needle goes in) with the alcohol wipe.
- Inject through the port:
- 1LB or 2LB bag: up to 10ml
- 4LB bag: up to 20ml
- Create an air pocket: a gap of air between the substrate and the filter patch (the breathable panel on the bag).
- Do not mix the bag at this stage.
- Lay the bag flat in a dark space at 24–27°C.
- Put it on a heat mat (a flat electric warming pad) or inside a heat box (an enclosed, warmed box).
Colonisation
Note: Growth times in this guide are typical averages from many bags, not guarantees. Growing is a live process, so every bag is different.
- Keep the bag sealed, in the dark, at 24–27°C while it colonises. Colonising means the mycelium (the fine white threads of the fungus) spreads through the substrate.
- Typically, the first white growth (mycelium) appears after 7–10 days.
- When about 30% of the substrate has turned white with mycelium, gently mix the bag.
- Wait about 10 more days.
- Mix the bag again when about 50–60% has turned white.
- When 95–100% is white, the bag is ready to fruit (grow mushrooms).
Fruiting
- Keep the temperature at 24–27°C.
- Give the bag 12 hours of light and 12 hours of dark.
- Keep the bag fully sealed until harvest. You don't need to cut it open or mist it (spray it with water) before then. The bag is designed to naturally maintain the ideal humidity and airflow for fruiting.
- Pins (baby mushrooms) usually appear in 7–21 days.
Harvest
- Harvest when the veil under the cap starts to tear. The veil is a thin skin that joins the edge of the cap to the stem.
- Now cut the bag open.
- Gently twist or cut the mushrooms off at the base.
- Keep the bag – more flushes (new rounds of mushrooms) are coming!
More flushes
- After each flush, pour half a cup of water around the edges of the block (the colonised substrate). This rehydrates it – puts water back into it.
- Leave it to soak for 12 hours at room temperature.
- Drain the water out completely.
- Let it sit, with the bag open or tilted, for 30–40 minutes.
- Reseal the bag with paper clips, clothes pegs or something similar.
- Put the bag back in your fruiting setup (the temperature and light in Step 3).
- Most bags give up to 3 flushes. Some give more, depending on the nutrients left in the substrate.
Need help? Email support@trippingstore.co.uk or chat with us live at trippingstore.co.uk.
Happy growing!
Inject & Forget BRF Grow Bag Guide
Follow this complete step-by-step guide to using your Inject & Forget BRF All-in-One Grow Bag from Tripping Store.
Thank you for choosing the Inject & Forget BRF All-in-One Grow Bag! We hope you enjoy using it as much as we enjoyed making it.
This quick guide covers everything from injection to harvest. Please read it before you start.
Note: This is a unique “Inject & Forget” style bag. Keep it fully sealed until harvest. You don't need to cut or open the bag at any point before you pick your mushrooms.
How to Inject & Inoculate Your BRF Grow Bag
Inject the bag
- 24 hours before you inject, take your spore syringe (the tube of liquid you'll inject) out of the fridge so it reaches room temperature.
- Wash your hands or put on gloves.
- Take the bag out of its outer packaging. Don't use scissors!
- Give the syringe a good shake.
- Attach the needle.
- Do not heat the needle. It's pre-sterile (already germ-free), and heat can damage the injection port (the rubber spot where the needle goes in).
- Clean the rubber port with the alcohol wipe.
- Inject through the port:
- 1LB or 2LB bag: up to 10ml
- 4LB bag: up to 20ml
- Mix the bag for 2 minutes to spread the liquid.
- Lay the bag flat in a dark, warm place at 24–27°C.
Colonisation
Note: Growth times in this guide are typical averages from many bags, not guarantees. Growing is a live process, so every bag is different.
- Keep the bag in the dark at 24–27°C while it colonises. Colonising means the mycelium (the fine white threads of the fungus) spreads through what's inside the bag.
- Typically, the first white growth (mycelium) appears after 7–10 days.
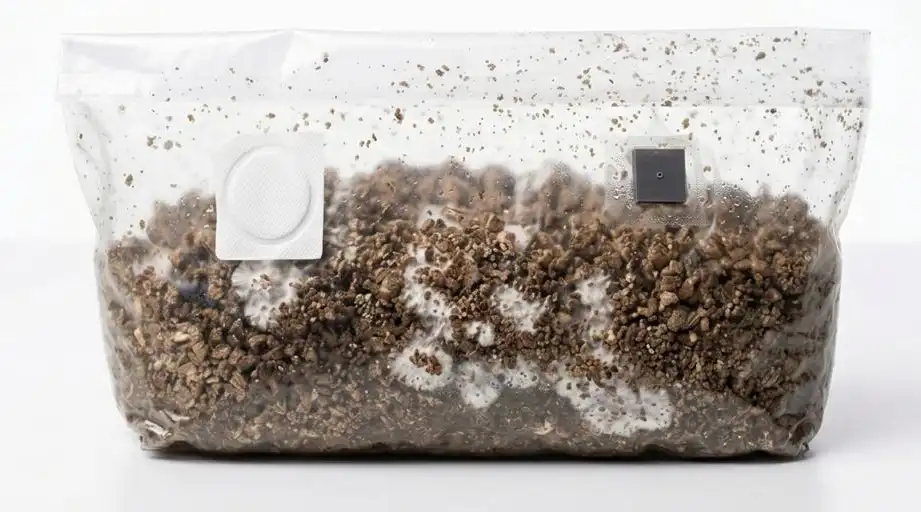
- When about 30% of the bag has turned white, mix the bag again.

About 30% white - After about 10 more days (when about 50–60% is white), mix it again.

About 60% white - Shape it into a block.
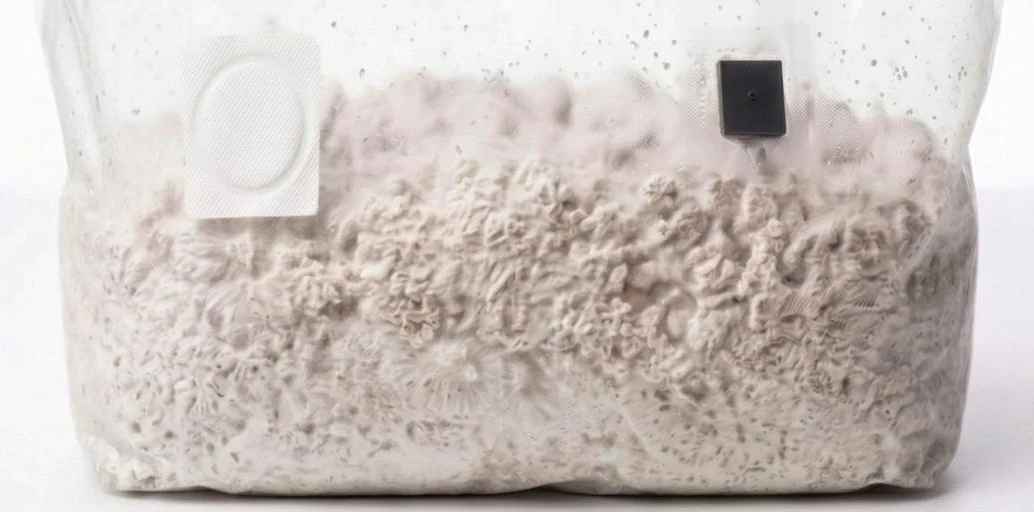
- When it's fully white, it's ready for fruiting (growing mushrooms).

Fully white: ready for fruiting
Fruiting
- Move the bag to a spot with 12 hours of light and 12 hours of dark. The light can be natural light or a white lamp.
- Keep the temperature at 24–27°C.
- Do not open or cut the bag. It stays sealed throughout fruiting.
- Pins (baby mushrooms) appear in 10–28 days.
Harvesting
- Your mushrooms are ready when the veil under the cap tears. The veil is a thin skin that joins the edge of the cap to the stem.
- Now cut the bag open.
- Gently twist or cut off the mushrooms.
- Keep the bag for more flushes (new rounds of mushrooms)!
More flushes
- After each flush, rehydrate the bag (put water back into it) by pouring water inside, around the edges:
- 1LB bag: ¼ cup
- 2LB bag: ½ cup
- 4LB bag: ¾ cup
- Leave it to soak for 12 hours at room temperature.
- Drain all the water out well.
- Tilt the bag for 30–40 minutes.
- Reseal the bag with paper clips, clothes pegs or something similar.
- Put the bag back in your fruiting setup (the temperature and light in Step 3).
- Most bags give up to 3 flushes. Some give more, depending on the nutrients left in the bag.
Need help? Email support@trippingstore.co.uk or chat with us live at trippingstore.co.uk.
Thanks again, and happy growing!
Core Monotub Cultivation Kit Instructions
Follow this complete step-by-step guide to using your Core Monotub Cultivation Kit from Tripping Store.
Thank you for choosing our Monotub Kit! We hope you enjoy using it as much as we enjoyed making it.
We've put together this short guide to help you get the best out of your mushroom-growing experience. Please take the time to read it in full.
Inoculation – inject the grain bag
- 24 hours before you inject, take your spore syringe (the tube of liquid you'll inject) out of the fridge so it reaches room temperature.
- Clean your workspace, such as a kitchen surface, with 70% isopropyl alcohol (a cleaning alcohol that disinfects surfaces).
- Recommended: put on your gloves.
- Recommended: sanitise your gloves with isopropyl alcohol.
- Unfold the grain bag (the bag of grain that you inject).
- Mix up the grain inside it.
- Give the syringe a good shake.
- Take the cap off the syringe.
- Attach the sterile (germ-free) needle, keeping the needle's cover on.
- Wipe the bag's injection port (the spot where the needle goes in) with the alcohol swab provided.
- Take the cover off the needle.
- Inject 20ml of the solution (the liquid in your syringe) through the port.
Incubation – keep the bag warm and dark
Note: Growth times in this guide are typical averages from many kits, not guarantees. Growing is a live process, so every kit is different.
- Keep the grain bag in a dark, warm spot at 24–27°C.
- Mycelium (the fine white threads of the fungus) typically takes 2–3 weeks to colonise the grain (spread through it).
- When about 30% of the grain is colonised (white with mycelium), gently break up the colonised parts.
- Mix them into the rest of the grain.
- Gently pat the grain into a block.
- When the grain is fully colonised, move on to Step 3, spawning. Spawning means mixing the grain into the substrate (the bulk growing material).
Spawning
- Clean your workspace, gloves, MonoTub (the growing tub), grain bag and substrate bag with 70% isopropyl alcohol.
- Break up the colonised grain completely.
- Cut open the grain bag.
- Empty the grain into the MonoTub.
- Empty most of the substrate bag into the MonoTub too. Save about 1/4 for the casing layer (a thin top layer of plain substrate).
- Mix the grain and substrate evenly.
- Gently level the surface.
- Spread the substrate you saved on top as a thin, even casing layer. Don't mix it in.
- Put the MonoTub in a dark area, away from direct sunlight. Some ambient light (normal background light in the room) is okay.
- Keep the tub's air vents closed.
- Keep it at 24–27°C until it's fully colonised – typically 7–14 days.
Fruiting – growing the mushrooms
- Open the MonoTub's air vents slightly to let in more oxygen.
- Keep the MonoTub in a warm spot at 24–27°C.
- Give it indirect light (light that doesn't shine straight onto it) for 4–6 hours a day.
- Mist (spray water) only if needed. If the substrate looks dry, give one or two sprays onto the lid.
- While the mushrooms are growing, avoid spraying onto the substrate.
- Pins (baby mushrooms) should appear 14–21 days after spawning.
Harvesting
- Harvest as the veils start to break. A veil is a thin skin that joins the edge of the cap to the stem.
- After each flush (round of mushrooms), rehydrate the substrate (put water back into it) by misting it. A heavy misting is typical, but how much each tub needs will vary.
- Most MonoTubs give 2–3 flushes. Some give more, depending on the nutrients left in the substrate.
- Your grow is done when no more mushrooms appear, or when contamination occurs (unwanted mould or bacteria growing in the tub).
- Compost the spent substrate (the used-up growing material).
Need help? Email support@trippingstore.co.uk or chat with us live at trippingstore.co.uk.
Happy growing!