

Welcome to the World of Mushroom Cultivation with Tripping Store’s BRF Inject & Forget Grow Bag!
Our BRF (Brown Rice Flour) Inject & Forget Grow Bag is designed for effortless mushroom cultivation. With this bag, there’s no need to mist, cut, fan, or adjust humidity—just inject your spores, follow the simple steps, and let nature do the work!
Let’s get started on your hassle-free mushroom-growing journey.
Step 1: Initiate the Magic – Prepare and Sow Your Spores!

- Wash Your Hands! Before beginning, thoroughly wash your hands and ensure you’re working in a clean environment.
- Proper Spore Storage: If not using your spores immediately, store them in the fridge. Take them out 24 hours before use to reach room temperature.
- Shake It Up! Before injecting, give the syringe a very good shake to evenly distribute the spores.
- No Need to Heat the Needle: These are medical-grade sterile needles, so there’s no need to flame them. Keep it simple!
- Cleanliness is Key: Use the alcohol wipe provided to clean the bag’s injection point.
- Inject Your Spores: Quickly remove the syringe cap, insert the needle through the injection port, and inject your spores evenly.
- Mix the Bag: After injecting the spores, remove the needle and give the bag a thorough mix.
- Break Up Lumps & Clumps: Gently massage the bag, making sure to break up any lumps or clumps, ensuring the spores are well distributed.
- Lay It on Its Side: Once mixed, place the bag on its side—this helps promote even colonization.
Step 2: Mix at 30% Colonization
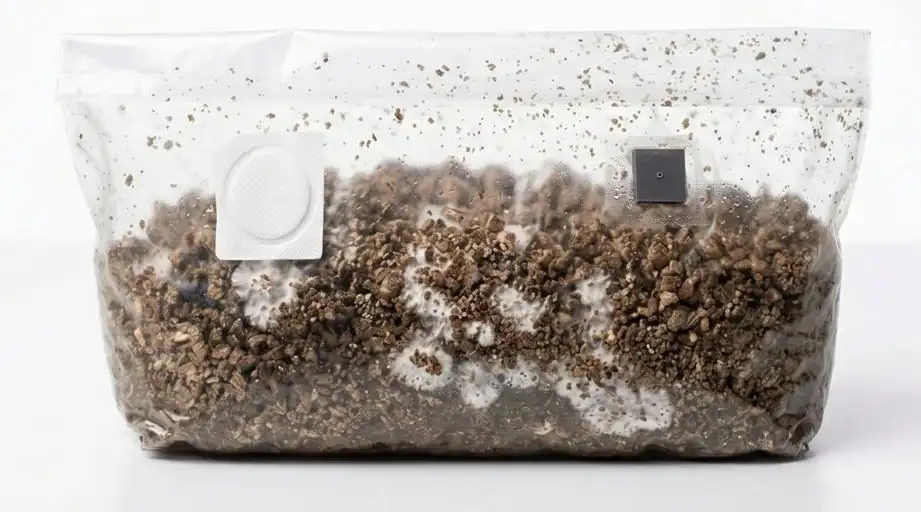 Once the bag reaches 30% colonization (when you see white mycelium spreading), it’s time for the first mix:
- Gently break up and mix the colonized sections with the uncolonized substrate.
- Lay the bag on its side after mixing to promote even growth.
- This helps distribute the mycelium evenly and speeds up colonization.
📹 Watch the video guide to see exactly how to mix and position the bag correctly!
Step 3: Mix at 60% Colonization
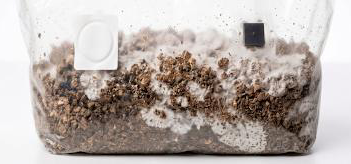
Once the bag reaches about 60% colonization, perform one final mix:
- Again, gently mix the colonized and uncolonized areas to speed up full colonization.
- Lay the bag on its side again and let it sit undisturbed until 100% colonization is achieved.
Step 4: Fruiting Conditions – The Final Step!
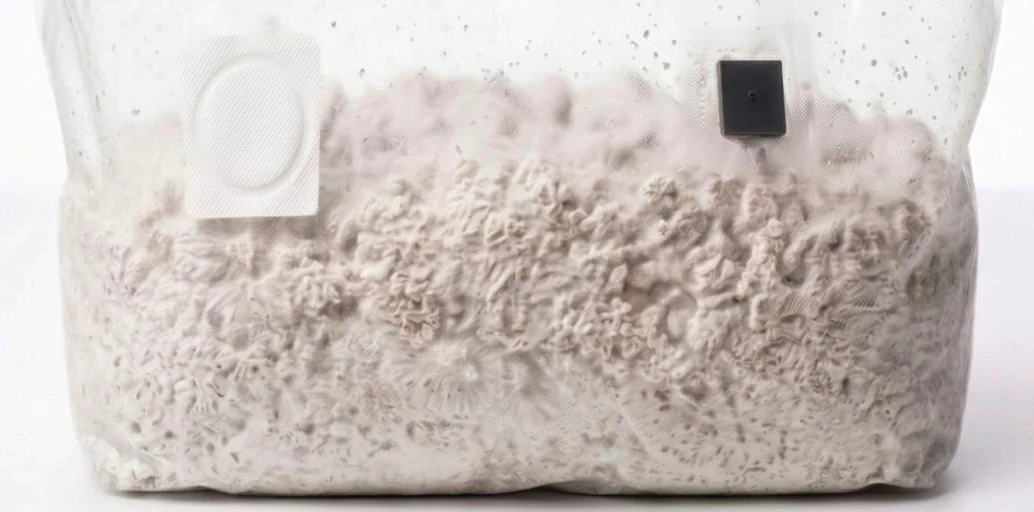
Once the bag is fully colonized, it’s time to introduce light!
- Light Cycle: Set a 12-hour on, 12-hour off light cycle.
- No need to mist, cut, or introduce airflow—everything happens inside the bag!
- Sit back and watch as your mushrooms start to grow!
Step 5: Harvesting – The Magical Reveal

- Once your mushrooms have reached full maturity, simply open the bag and harvest!
- Twist or cut at the base to preserve the mycelium for possible future flushes.
Legal Disclaimer

Please ensure compliance with local laws regarding mushroom cultivation, as some species may be illegal to cultivate in certain regions worldwide. Tripping Store is not responsible for any legal issues that may arise from the use of our products. Customers are advised to be fully aware of and adhere to the laws in their region.
That’s It!
With the BRF Inject & Forget Grow Bag, cultivation is as simple as inject, mix, lay the bag on its side, wait, introduce light, and harvest. There’s no extra work, no misting, no fanning—just effortless results.
Enjoy your grow! 🍄


Can spore syringes be stores at room temp even if it reduces the shelf life? I know a fridge is ideal but I share a kitchen with roommates known to have sticky fingers.
Hi Adriana,
Thank you for your question!
The ideal storage for spore syringes is between 2°C and 6°C, so keeping them in a fridge is best. Outside of a fridge, their shelf life is reduced, lasting about two to three months, while in a fridge, they can last up to six to seven months. If you need to store them at room temperature, just ensure they are kept in the dark and away from sunlight to help them last as long as possible.
How many mls of spores do you need to inject for a 4lb bag?
The guide sizes from bags to spores are as follows:
• 1 lb bag: 5-7 ml spores
• 2 lb bag: 10 ml spores
• 4 lb bag: 20 ml spores
• 1.5 kg grain bag: 20 ml spores
• 1 lb grain bag: 5-7 ml spores
With the Dutch kit’s you give them a soak (cold shock) after harvesting,
Can you do the same with the dung master bags to promote further flushes?
Hi,
Thanks for your question!
To get further flushes with the Dung Master Bag, you’ll need to rehydrate the substrate. Here’s how:
Once you’ve harvested everything from the first flush, soak the substrate in water. Make sure to leave about an inch of the substrate above the waterline—this way, most of the substrate is soaked without being fully submerged. Use normal tap water for this.
Let it soak for 12 hours, then drain it thoroughly. Tilt the substrate at an angle to allow excess water to drain out, leaving it to drain well for about 45 minutes.
After draining, place the substrate back into fruiting conditions with the ideal temperature, light, and air circulation. This will help encourage the next flush.
Do you have to keep the temp consistent throughout grow into fruiting or just at Colonization stage
Hi,
Yes, temperature is very important, especially during the colonization phase, but it’s equally essential to maintain the right temperature during the fruiting stage to achieve optimal results. While the colonization phase is more sensitive to temperature fluctuations, it’s still critical to aim for the perfect range throughout both stages.
For the best results, you should maintain a consistent temperature between 24°C and 27°C during both the colonization and fruiting stages. This will help create the ideal environment for your mushrooms to thrive.
[…] 🔗For step-by-step grow bag instructions, click here. […]
When fruiting, how bright should a grow light be when set at 12/12?
Can you reassure me that there’s no need to open my grow bag when about to fruit? I’m thinking of moisture and oxygen exchange.
Thank you
Thanks for your question!
Yes, with the new BRF Grow Bags, you do not need to open them at all. They’re designed with a filter patch that regulates humidity, oxygen, and airflow perfectly — so all you need to do is introduce a light cycle once the bag is fully colonised (95% + colonisation)
The light doesn’t need to be strong, in fact, you don’t want anything too intense. A normal white lamp works great. If it’s a sunny day, you can place the bag near a window for natural light. If it’s grey outside or you’re in a location that doesn’t get much sun, a standard lamp with a white light will do the trick. Just keep it about 0.7 metres away from the bag to avoid too much heat or intensity. The goal is simply to simulate the rhythm of day and night, and that’s all you need.
Also, just to reassure you, all our bags come with a lifetime guarantee. If your bag doesn’t fruit or you have any issues at all, just get in touch with our team and we’ll send you out a free replacement, no problem at all. That’s how confident we are in our products!
Let us know if you have any more questions — we’re here to help.
Hello
I have one of your grow bags any chance of actual pictures S I have done it exactly to instructions
So what should it look like at week 4
When do you know it’s ready for fruiting
Hi there!
If you ever have a question about how your bag is doing at any stage, feel free to send us a quick email at support@trippingstore.co.uk with some clear images of your bag. We’ve got a friendly support team ready to help with any technical questions or issues you might be facing during the process — always happy to guide you through it!
Hope that helps and happy researching!
— Tripping Store Team
Hi, I’ve just purchased a 4lb BRF bag, moving on yo when harvested the first flush do I need to re-hydrate the bag?
Thanks
How to Get a Second Flush
1. Harvest everything from the bag. Once the first flush is fully picked the bag is ready for a second flush.
2. Measure your water
• 4LB bag – three quarters of a cup of water
• 2LB bag – one third of a cup of water
• 1LB bag – one quarter of a cup of water
3. Take the bag off the heat mat and place it on a clean surface. Use normal room temperature tap water.
4. Pour the water slowly around the edges of the bag so it runs down the sides of the substrate. Do not pour onto the top or into the middle. You are rehydrating from the sides.
5. Let the bag sit for 12 hours to soak.
6. Carefully drain the water. Support the colonized block so it does not break. Drain well for about 25 minutes until no free water is left.
7. Close the bag. You can clip it shut with paper clips or anything similar. It does not have to be sealed 100 percent but aim to close most of the bag.
8. Return the bag to fruiting conditions. Keep temperature between 24 and 27 degrees Celsius and introduce a 12 hours light and 12 hours dark cycle.
9. Leave it to recover. You should start to see new pins in about 10 days to two weeks. Keep conditions steady and avoid handling the bag during this time.
What do I do if I don’t have a light source also what temperature do I set the grow pad to?
If you don’t have a dedicated light source, don’t worry. A light is only used as a signal to trigger fruiting and does not need to be anything specialised. Natural daylight from a nearby window is more than enough, even if it is indirect. If you prefer to use an artificial light, a simple white lamp, LED light, or fish tank light works perfectly. There is no need for a specific type or grade of light. White light works best. If the light is direct, keep it roughly 0.8 metres away from the bag and make sure it is gentle. Avoid anything too harsh or intense, as strong direct light is not necessary.
For temperature, the grow bag needs to be kept between 24 and 27 degrees Celsius. The important thing to understand is that the entire bag should be within this temperature range, not just the surface touching the heat pad. If the heat pad is set correctly but the room itself is very cold, the bag may struggle. In colder environments, it is a good idea to place the bag in a box or insulated space to help retain warmth so the whole bag stays consistently between 24 and 27 degrees Celsius.
Hi.
I have the 1lb all in one grow bag. After the final mix, how long roughly will it take for the mix to be 95%-100% colonised?
Thanks,
Vic.
For a 1lb All in One grow bag, after the final mix, full colonization usually takes around 7 to 14 days under good conditions. That’s the average timeframe we’ve seen, though depending on the strain it can sometimes take a little longer, and some of the strains we offer may take up to around 28 days to fully colonize, so patience is always important.
Just to mention, our products are sold strictly for research purposes only, so please make sure you’re aware of the laws in your region before making a purchase. Some areas have different regulations, and it’s always good to stay informed.
I’ve got a 4IB bag. Used 20ml blue meanies, I have loads of pin and a few decent sized mushrooms, I’ll likely have some ready while lots aren’t, they’re also growing underneath, at the sides, facing down. Some facing up, there’s even some growing off the side of the bag 🤣 but what I want to know is which ones do I pick? Do I leave it for all to mature or do I pick ones ready and reseal the bag? I waited 6 weeks mixing until fully colonised and don’t want to mess it up now… it’s in a box with the heat Matt sat in the window. Just not sure when to pick or how best to open the bag….
When and How to Harvest Your Grow Bag – Understanding Pins, Light, and Timing
If you see mushrooms growing from all angles such as underneath, at the sides, or facing down, it is completely normal. This usually happens because of how light reaches the bag. Mushrooms naturally grow toward the light. When light hits from different directions, they start forming everywhere. To guide them upward, use a gentle steady light from above. If the light is too harsh or too close, they may grow away from it, so keep it balanced and indirect.
Side pinning can also occur if there is space between the substrate and the bag. It is not harmful, but most of it comes down to proper light positioning and avoiding strong side lighting.
When it comes to harvesting, timing is key. Partial harvesting is perfectly fine and often recommended. The best moment to pick is when the caps open up like umbrellas, just before the veil underneath tears. Harvest the ready ones gently, then reseal the bag using paper clips or clips to keep humidity stable and prevent the substrate from drying out.
Consistency, cleanliness, and the right light balance make all the difference in your results.
Disclaimer:
As a UK business we must remind you that some mushroom species including Blue Meanies (Psilocybe cubensis) are illegal to cultivate in the UK and other regions. All spores are sold strictly for microscopy and research purposes only. Cultivation should only take place where it is fully legal.